 01.33
01.33
 ipod touch review

11. Lift up the LCD screen. Now careful LCD screen is |  |
| 12. taken out the ipod LCD screen. |  |
| Now insert new LCD screen ribbon cable into the connector of main board, and lock the black tab of ribbon cable | 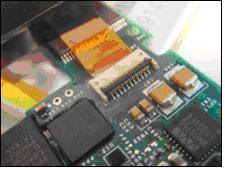 |
| Now remove the protective film (which is used to avoid scratch in packing of LCD screen) from the LCD screen. |  |
| 15 . Slide the LCD screen back on to the main board and you you need to follow reverse steps as while you have open the ipod |  |
| 16. Carefully push the main board back into the case.17. Push the battery where it was. How to replace Nano battery. |  |
| 18. Reinsert the 3 screws,be sure one with the coarse thread goes in the middle, and the 2 with fine thread go near the bottom. |  |
19. Make sure all the tiny metal tabs on the case are pushed down so |  |
| 20. Make sure hold switch is aligned with the case, then snap the iPod together. |  |
Sabtu, 26 Januari 2008
how to ipod lcd replacement instuctions
for first 10 steps of ipod lcd repair


0 komentar:
Posting Komentar